
What is an assessment?
An assessment is a comprehensive process that measures compliance with Web Content Accessibility Guidelines (WCAG) 2.2 Level AA success criteria. The assessment process currently includes 24 tests, and each test covers one or more accessibility requirements.
There are three types of requirement:
- Automated – the tool identifies instances and evaluates them automatically.
- Assisted – the tool actively helps you identify or evaluate instances.
- Manual – the tool provides instructions for identifying and evaluating instances.
Note: Completing an assessment requires you to use standard keyboard commands and to visually identify interactive interface elements.
How to complete an assessment
Get ready to test
-
In Chrome or the new Microsoft Edge, navigate to the page you want to test (aka the target page).
-
Open Accessibility Insights for Web:
- Select the extension icon.
or
- Press Alt+Shift+K (Option+Shift+K for macOS) (Customize this keyboard shortcut).
or
-
Use these keyboard commands:
Windows or Linux:
- Press Shift+Alt+T or F10 to set focus on the browser's address bar.
- Press the Left arrow to set focus on the Accessibility Insights for Web extension.
- Press the Space key to open the extension.
MacOS:
- Press ⌘+L to set focus on the browser's address bar.
- Press the Tab key to set focus on the Accessibility Insights for Web extension.
- Press the Space key to open the extension.
The Accessibility Insights for Web extension will open to the Launch pad.
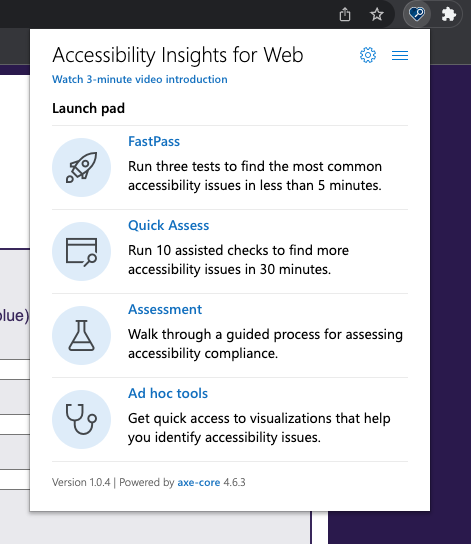
-
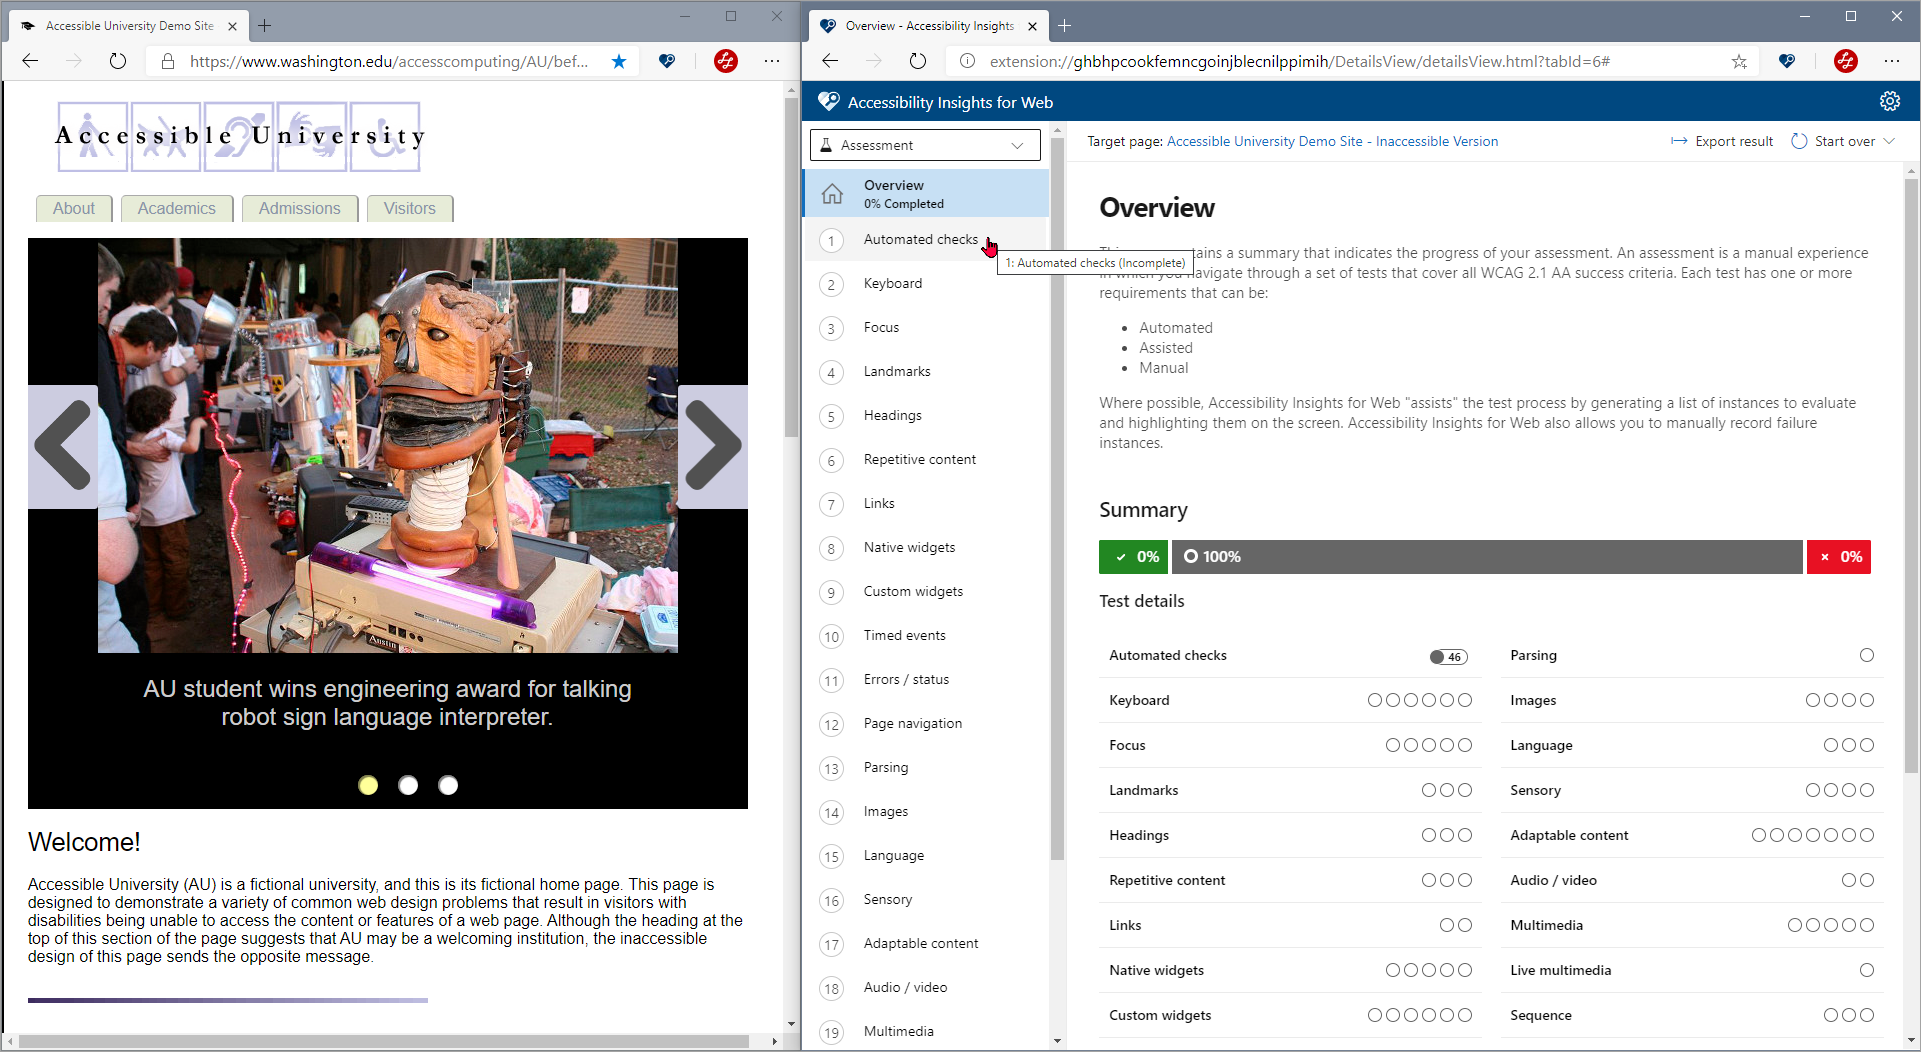
In the Launch pad, select Assessment.
A secondary browser window will open to an overview of the assessment process and results. At this point, the assessment is 100% incomplete, so no results are available.
Run the automated checks
-
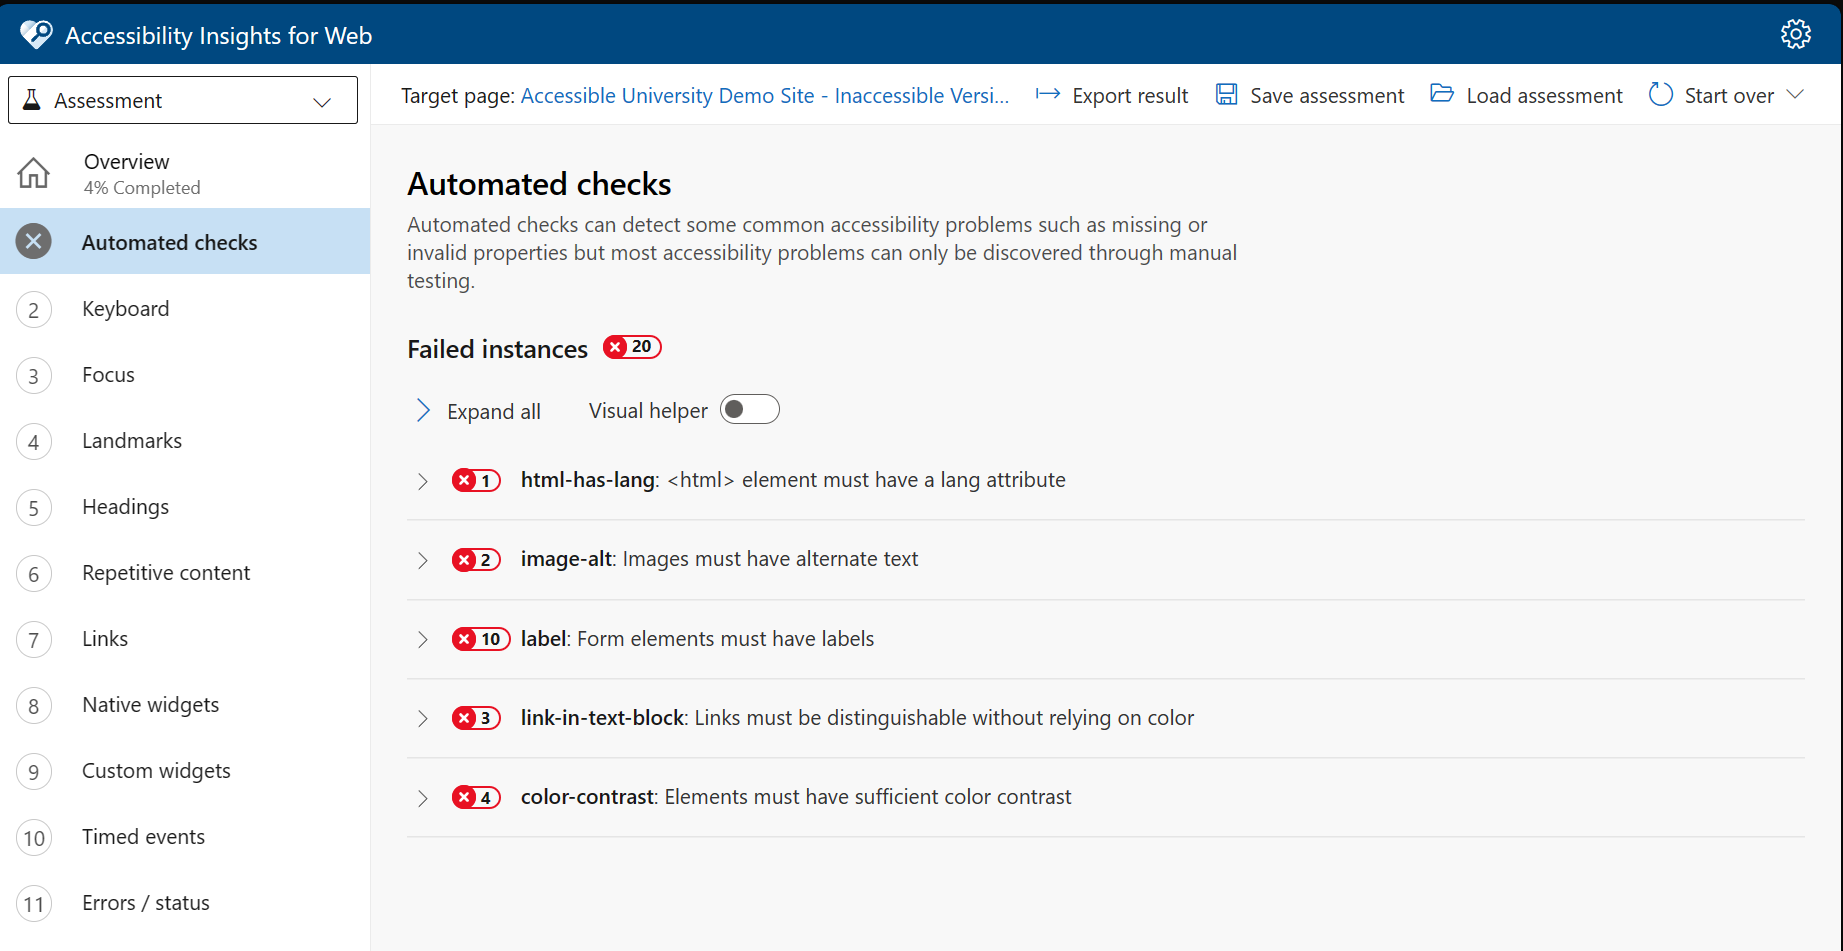
In the navigation pane, select Automated checks.
Automated checks will run on your target page. Activate the visual helper to highlight failure instances in the target page.
-
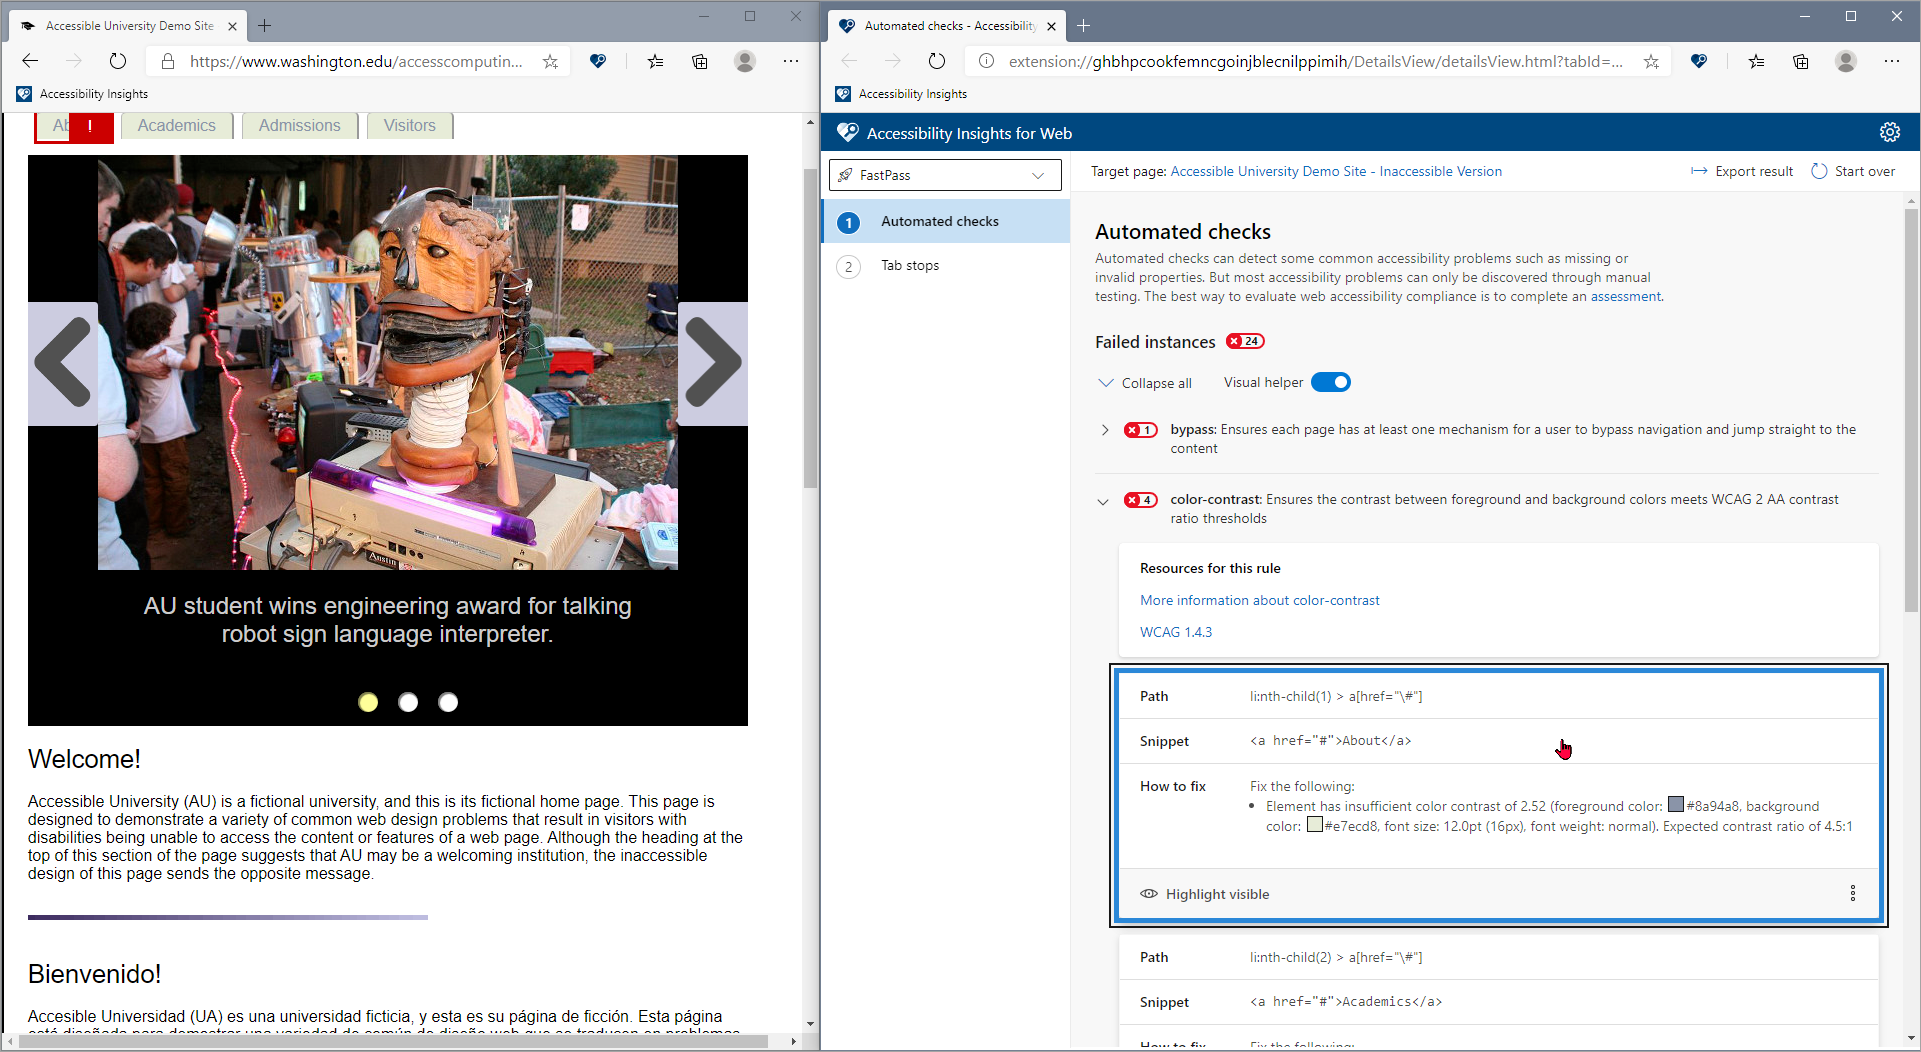
Review the automated check results.
You can review the automated check results in the Accessibility Insights for Web page.
Review results in the Accessibility Insights for Web page
By default, the Accessibility Insights for Web page shows:
- The total number of failed instances
- A list of any accessibility rules that were violated
- The number of failed instances for each rule
- A visual helper toggle that allows you to quickly show or hide failure highlighting in the target page
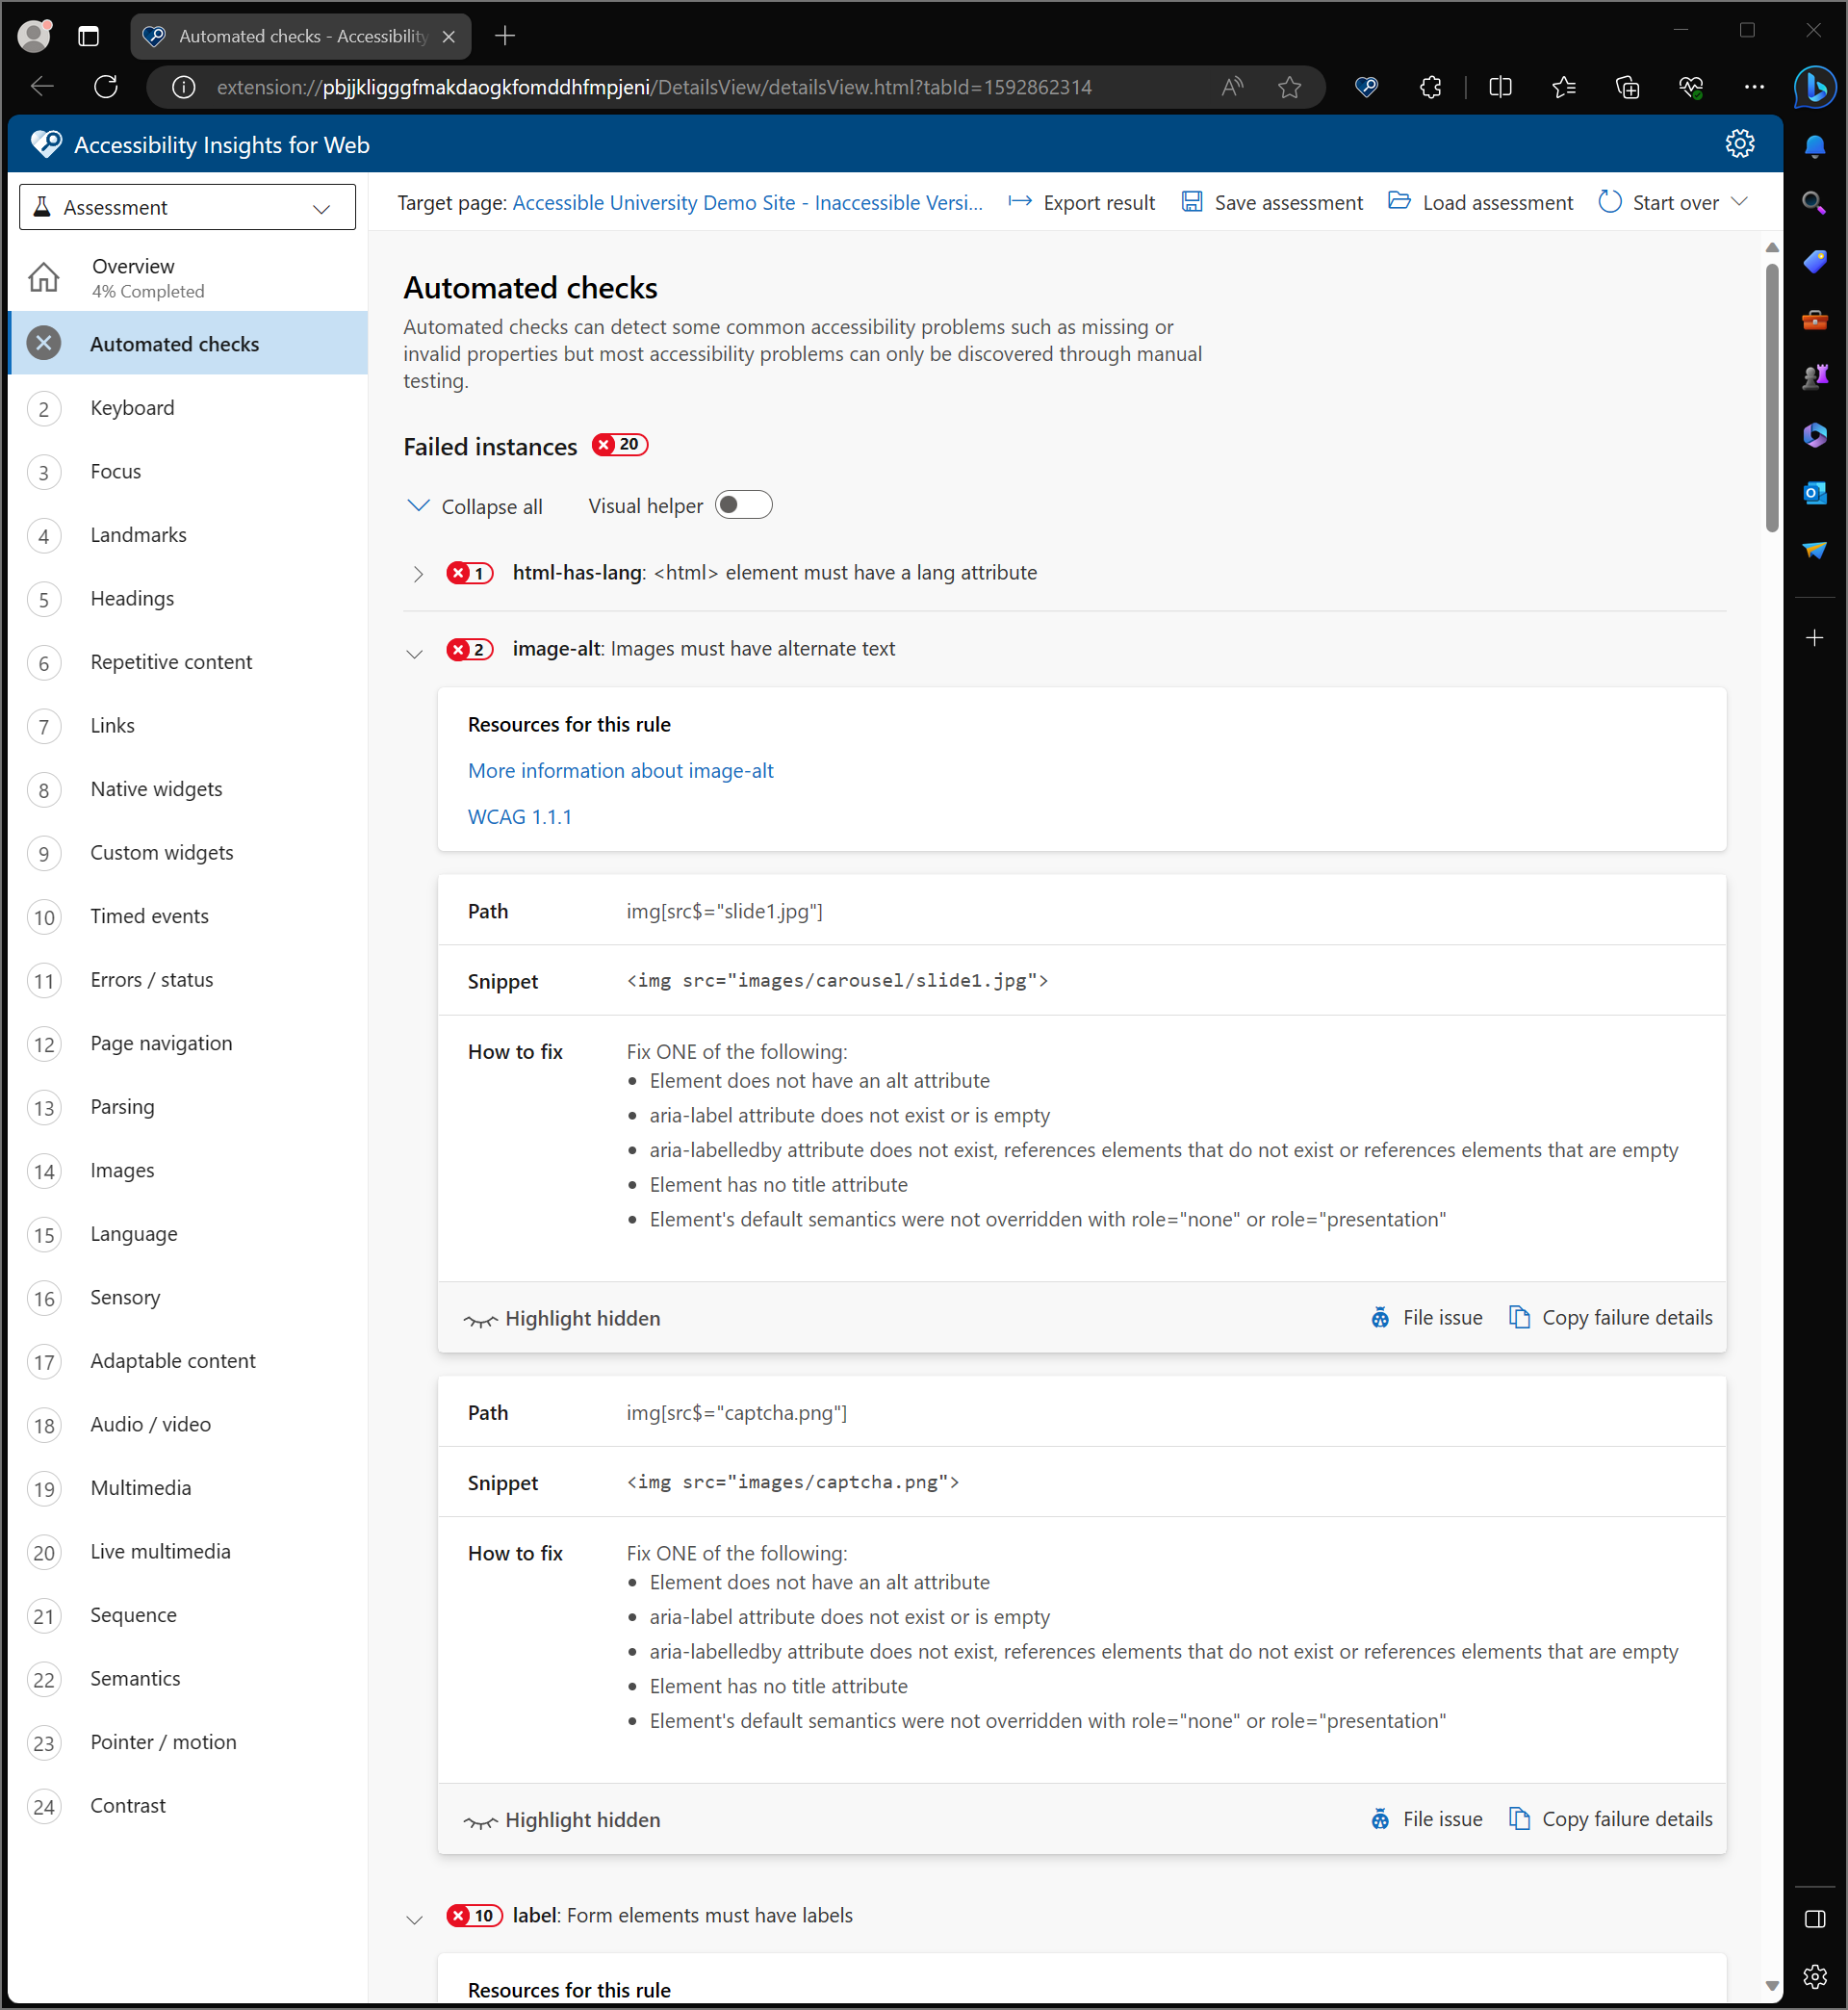
A rule can be expanded to show information about its failed instances. Rules can be expanded or collapsed:
- All at once by using Expand all / Collapse all
- Individually by clicking a rule, or by tabbing to it and pressing Enter
Expanding a rule:
- Shows links to additional information about the rule, including why it matters, examples, and detailed instructions for fixing
- Highlights its failed instances in the target page
- Shows the failed instances in a list
Each failed instance includes:
- Unique identifying information about the element that failed (for example, a CSS selector)
- How to fix the detected issue
- Additional information to help identify the element (some rules only)
- Buttons to take action on the individual issue. You can:
- File an issue in your GitHub or Azure Boards repository.
- Copy failure details to your clipboard and paste them into the tool or document of your choice.
Selecting a failed instance highlights it in the target page. You can select multiple instances. An instance can be selected or deselected by clicking it, or by tabbing to it and pressing Enter.
Complete the assisted and manual tests
Each of the remaining tests covers a set of related requirements. We recommend completing the tests and requirements in the order they appear in the navigation pane.
-
In the navigation pane, collapse the list of automated checks by selecting Automated checks.
-
Select the next test (Keyboard).
The navigation pane will expand to show all of the test requirements.
-
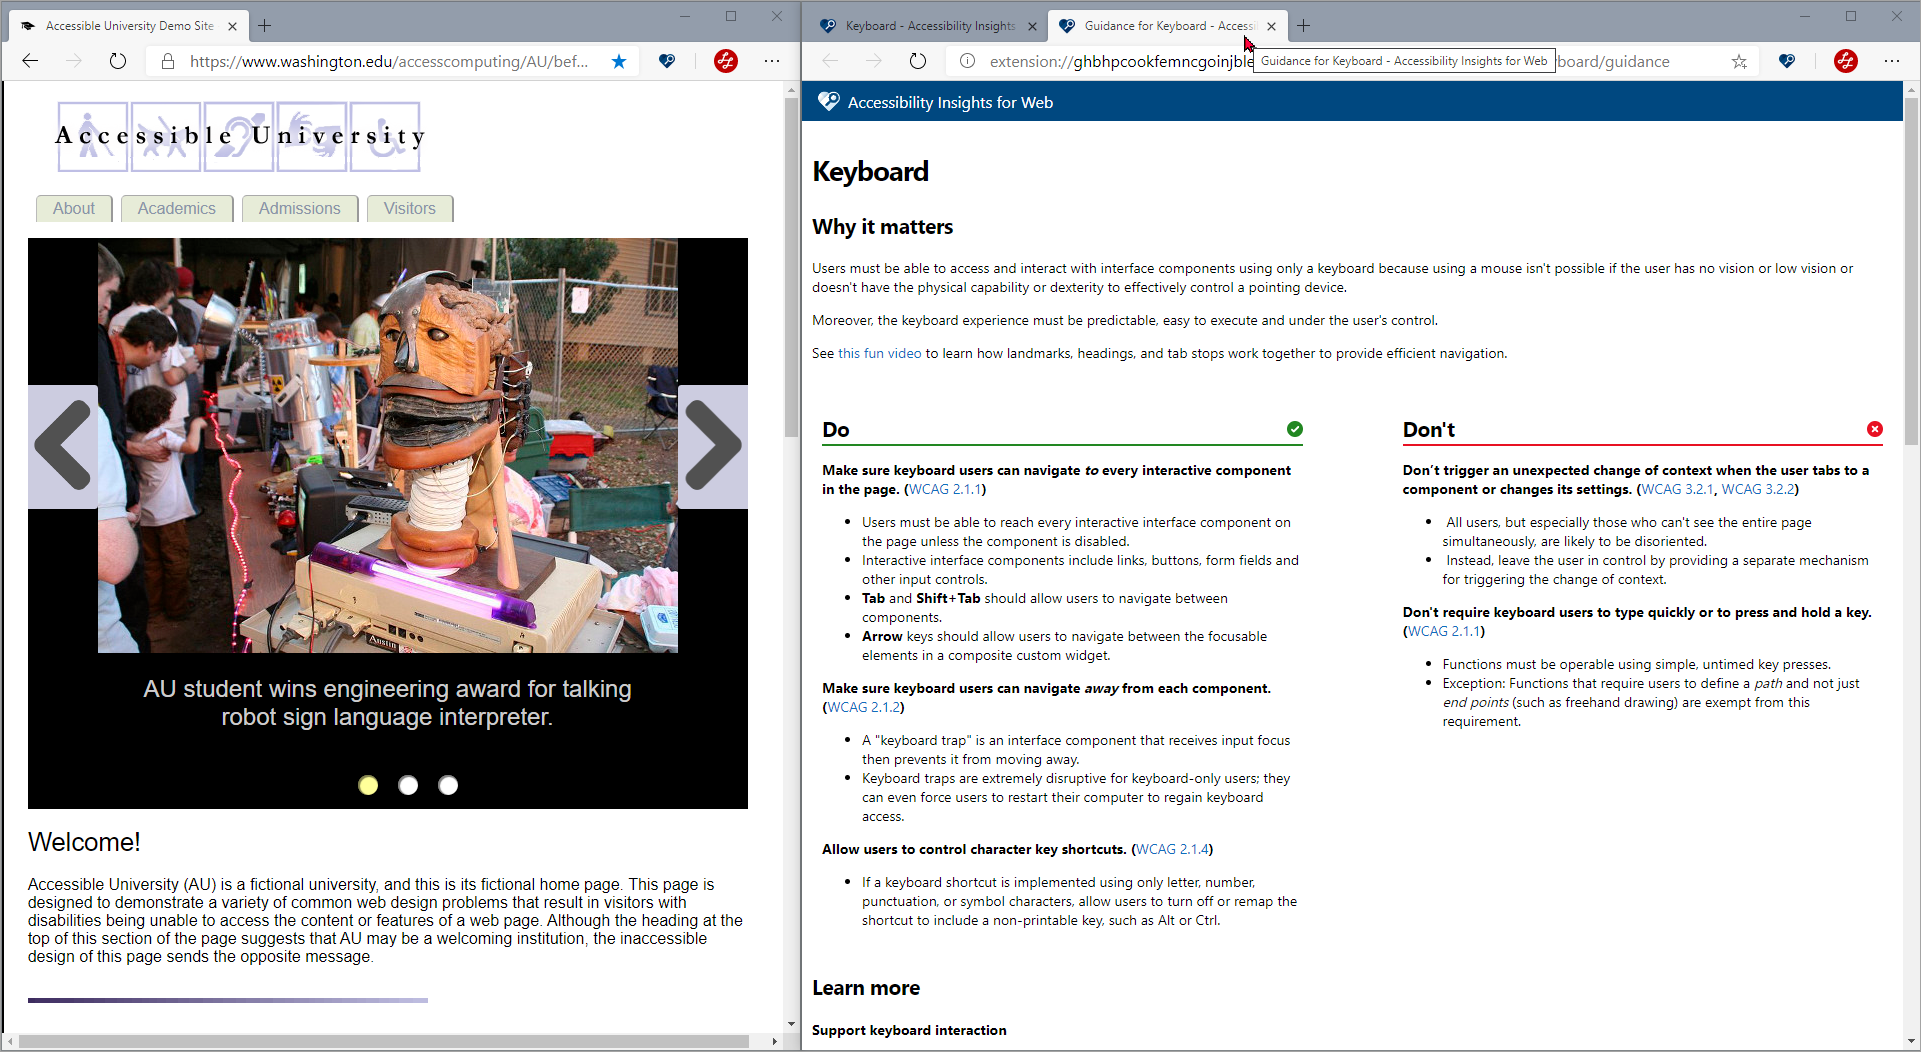
Optional: To learn more about the test:
-
In the navigation pane, under the test name, select Getting started.
The main pane will update to show introductory information about the test.
-
In the main pane, next to the page title, select Guidance .
A new browser tab will open with additional information about the test:
- Why it matters
- Do-and-don't design guidelines
- Links to relevant WCAG success criteria, sufficient techniques, and common failures.
-
-
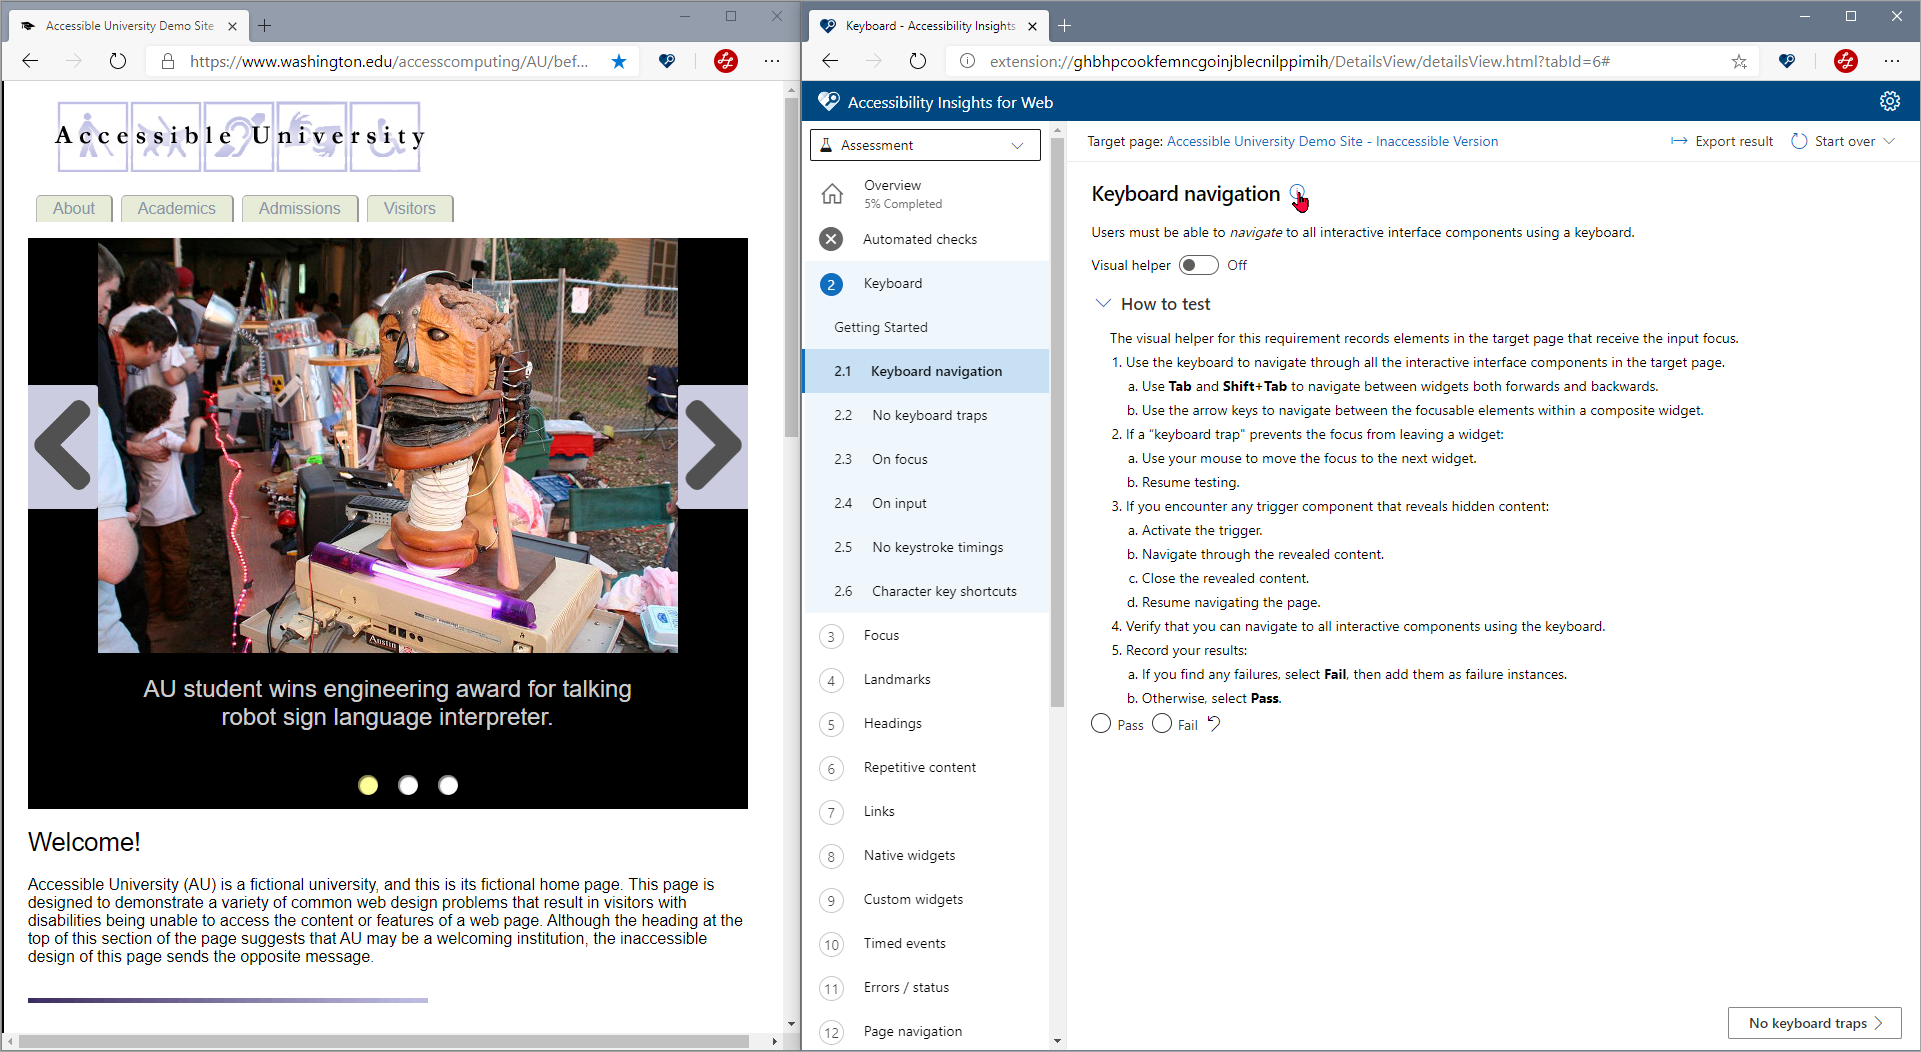
In the navigation pane, under Keyboard, select the first requirement (Keyboard navigation).
The main pane will update to show test instructions for the selected requirement.
-
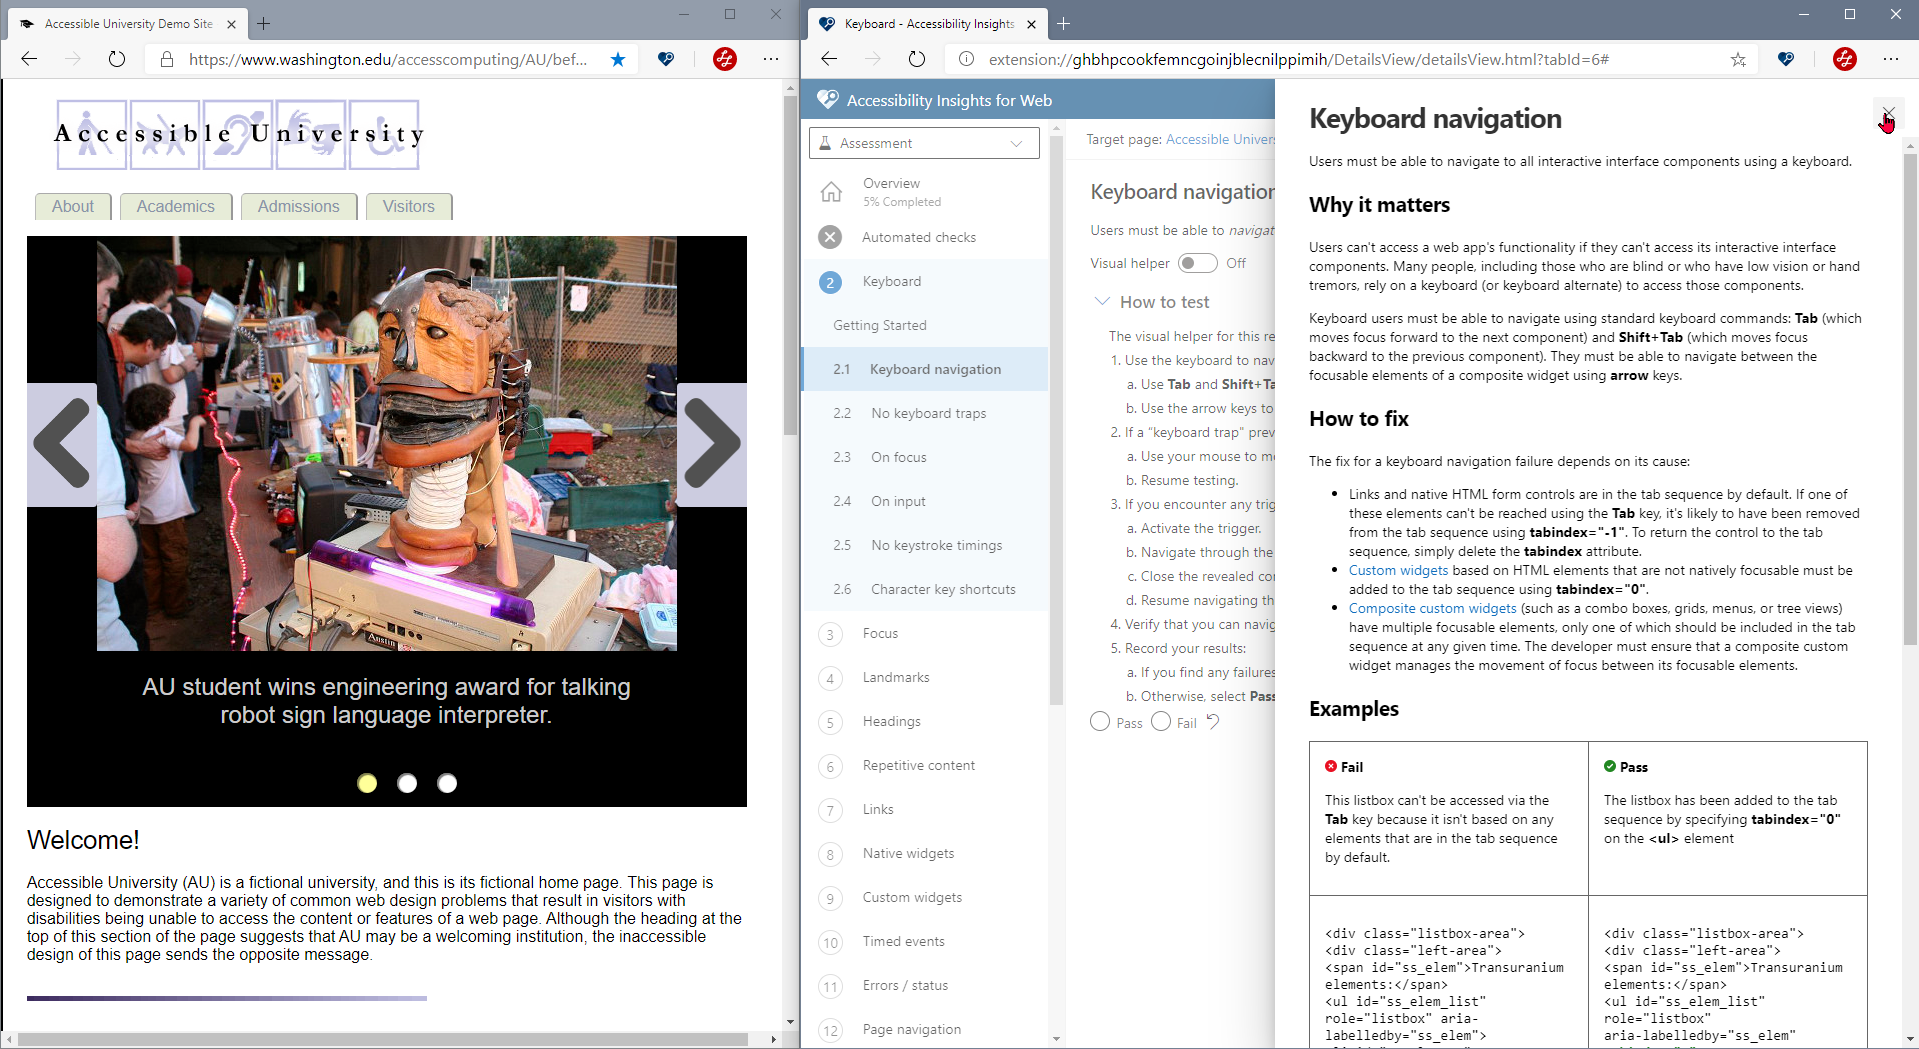
Optional: To learn more about a requirement, select Guidance .
A side panel will open with detailed information about the requirement:
- Why it matters
- From a user's perspective (where applicable). This is a contribution from the Design for People Guidelines.
- How to fix
- Examples
- Code snippets (where applicable)
- Links to relevant WCAG success criteria, sufficient techniques, and common failures.
-
Read the instructions under How to test.
-
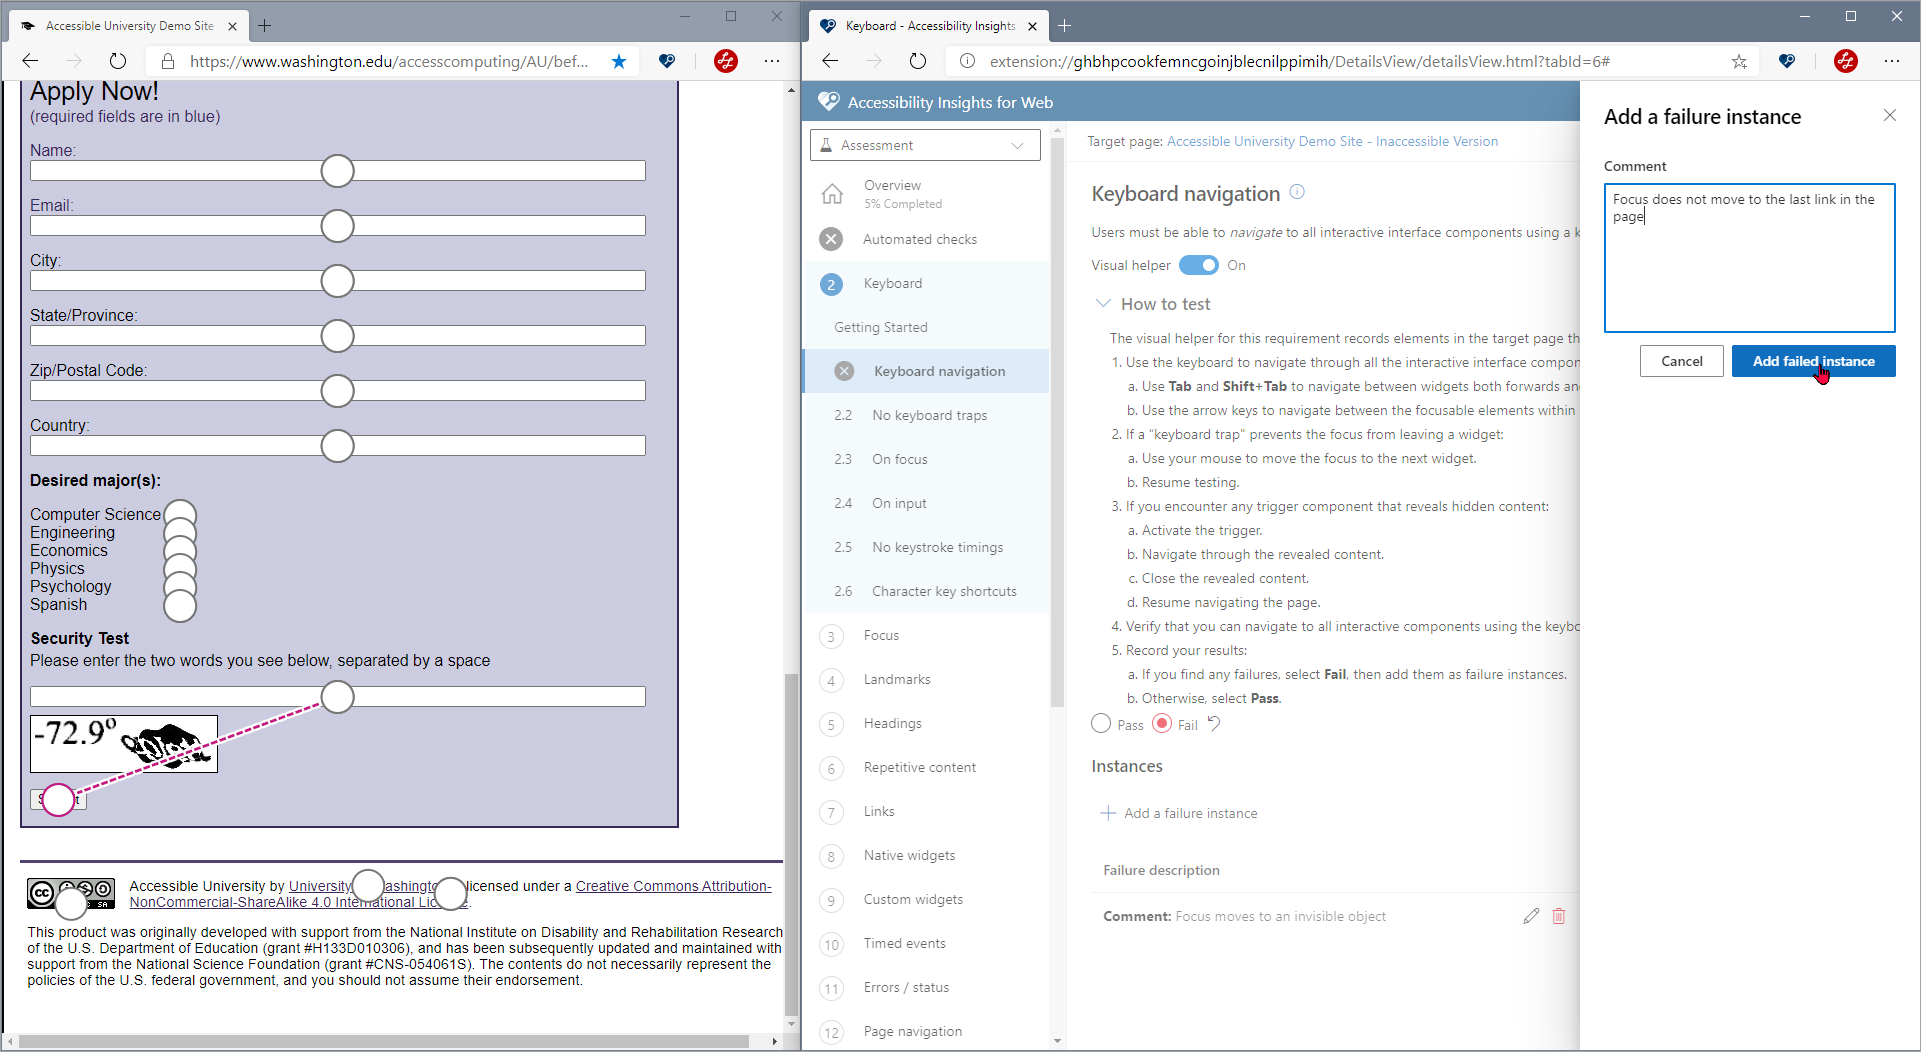
Evaluate the instances and record your results.
Some requirements in an assessment require you to manually identify the instances to evaluate. (All of the requirements in the Keyboard test require you to manually identify instances.)
Some requirements automatically generate a list of instances to evaluate. (The first requirement that generates a list of instances is in the Landmarks test.)
-
For manual requirements:
-
Select Pass or Fail for the requirement.
Tip: You can reset a requirement to its original indeterminate state by selecting Undo .
-
If the requirement fails, add a failure instance. (If the requirement passes, no further input is needed.)
-
-
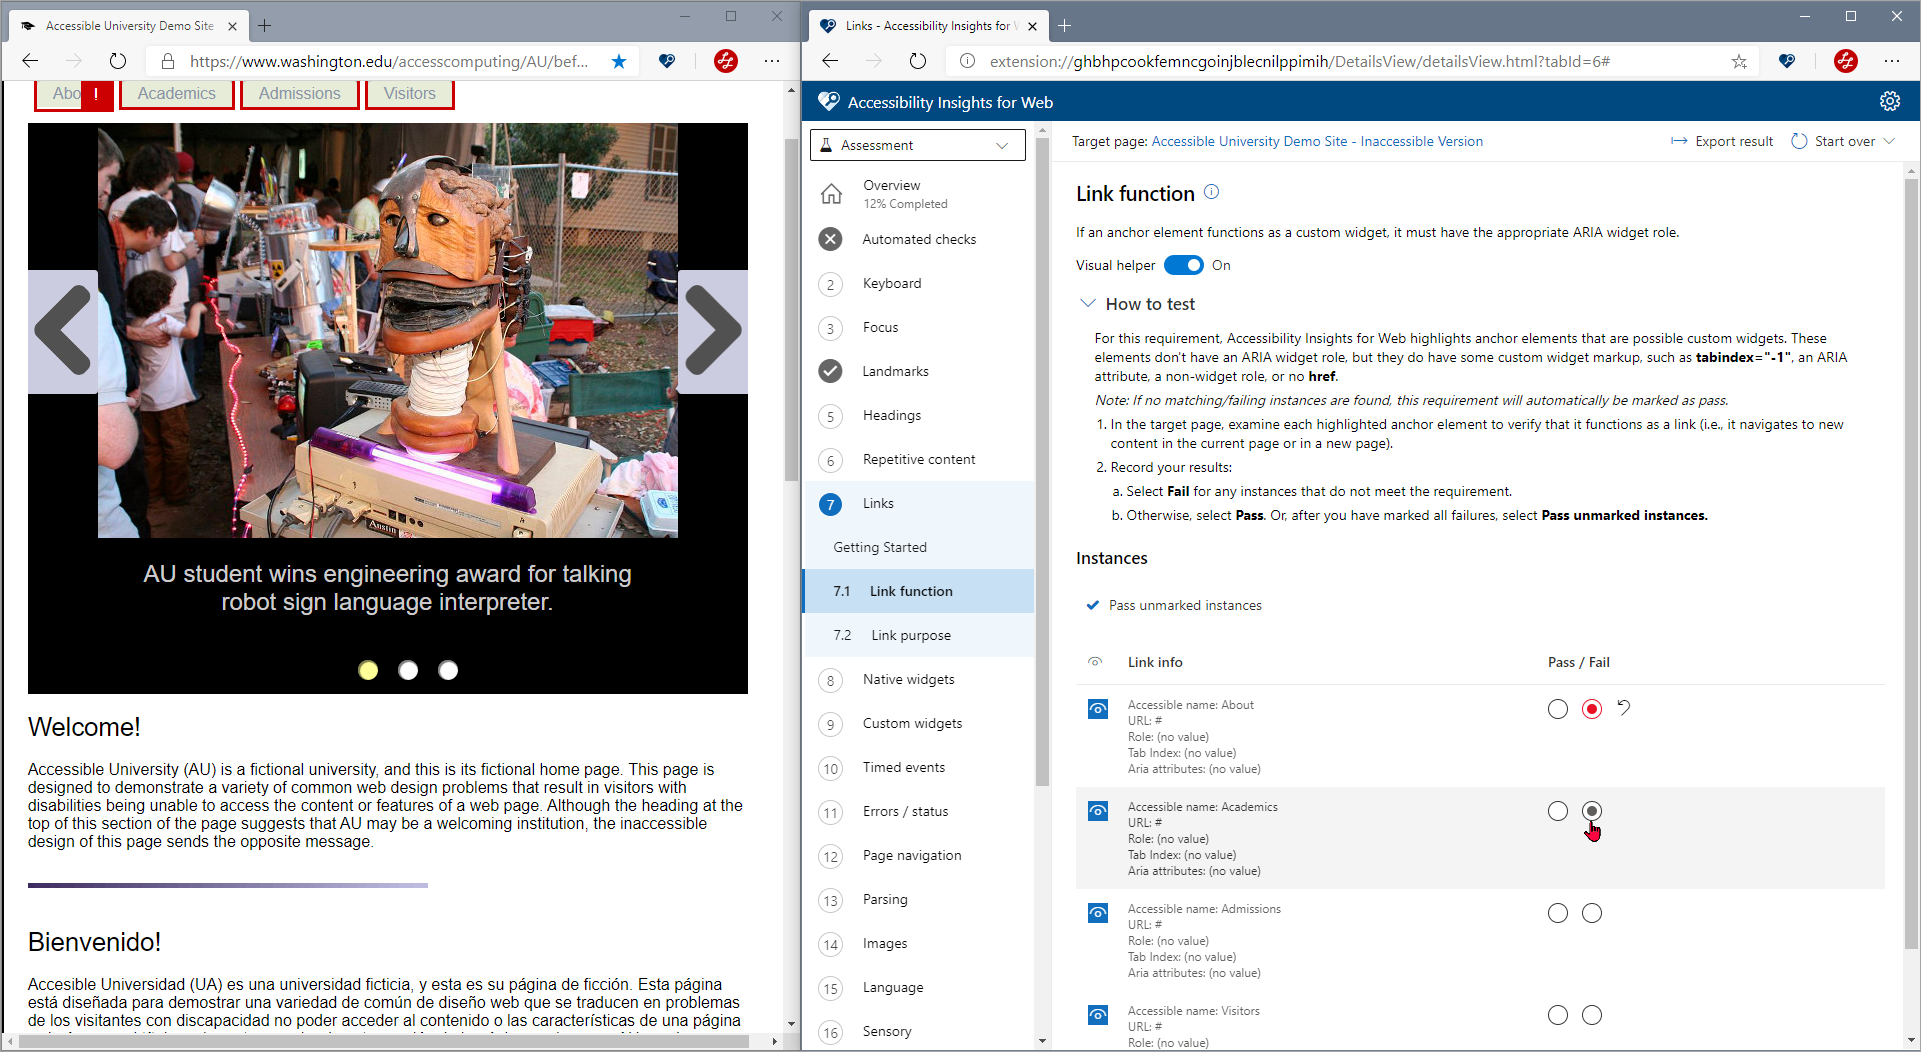
For assisted requirements, select Pass or Fail for each instance.
Tip: You can reset an instance to is original indeterminate state by selecting Undo . Tip: After you mark all the failures, you can pass the remaining instances by selecting Pass unmarked instances.
-
-
Select the next requirement, follow the instructions, and record your results.
-
Repeat with the remaining tests.
-
When every requirement in every test is marked as Pass or Fail, your assessment is complete.
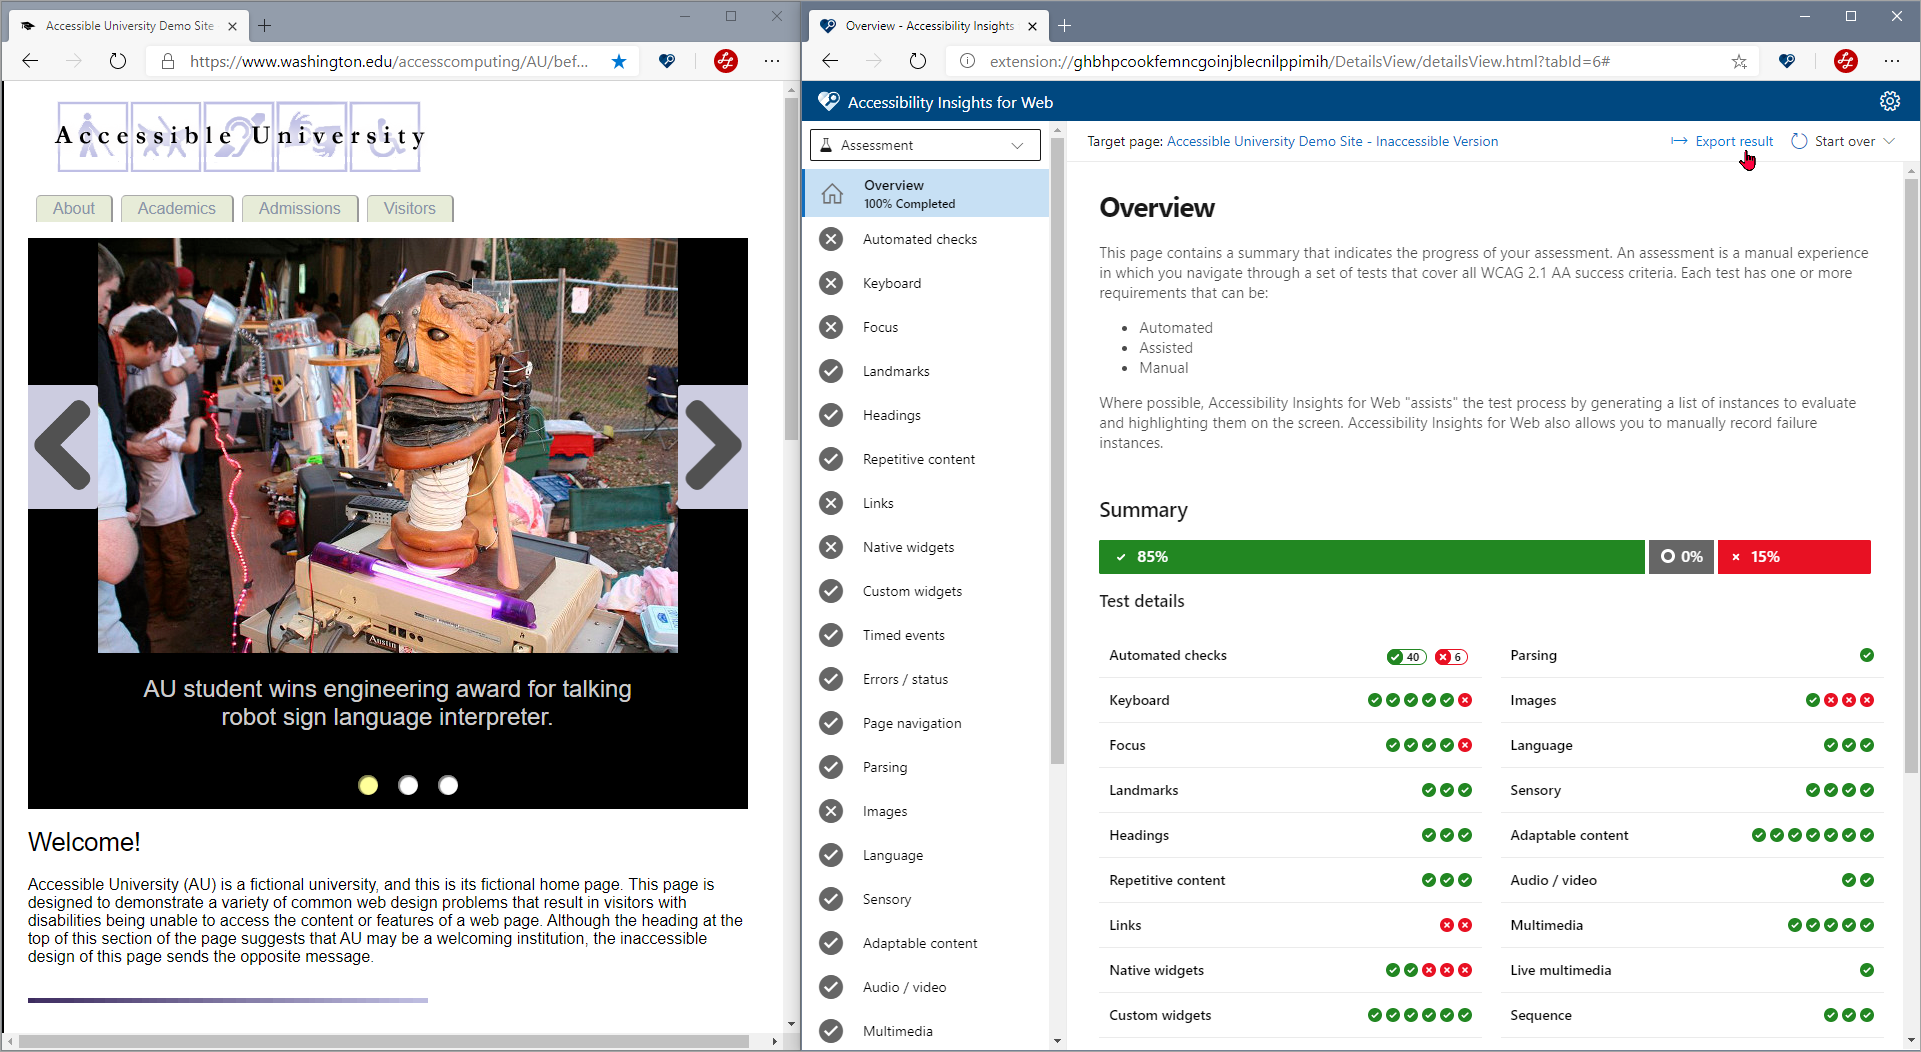
View a summary of the assessment results
At any time, select Overview in the navigation pane.
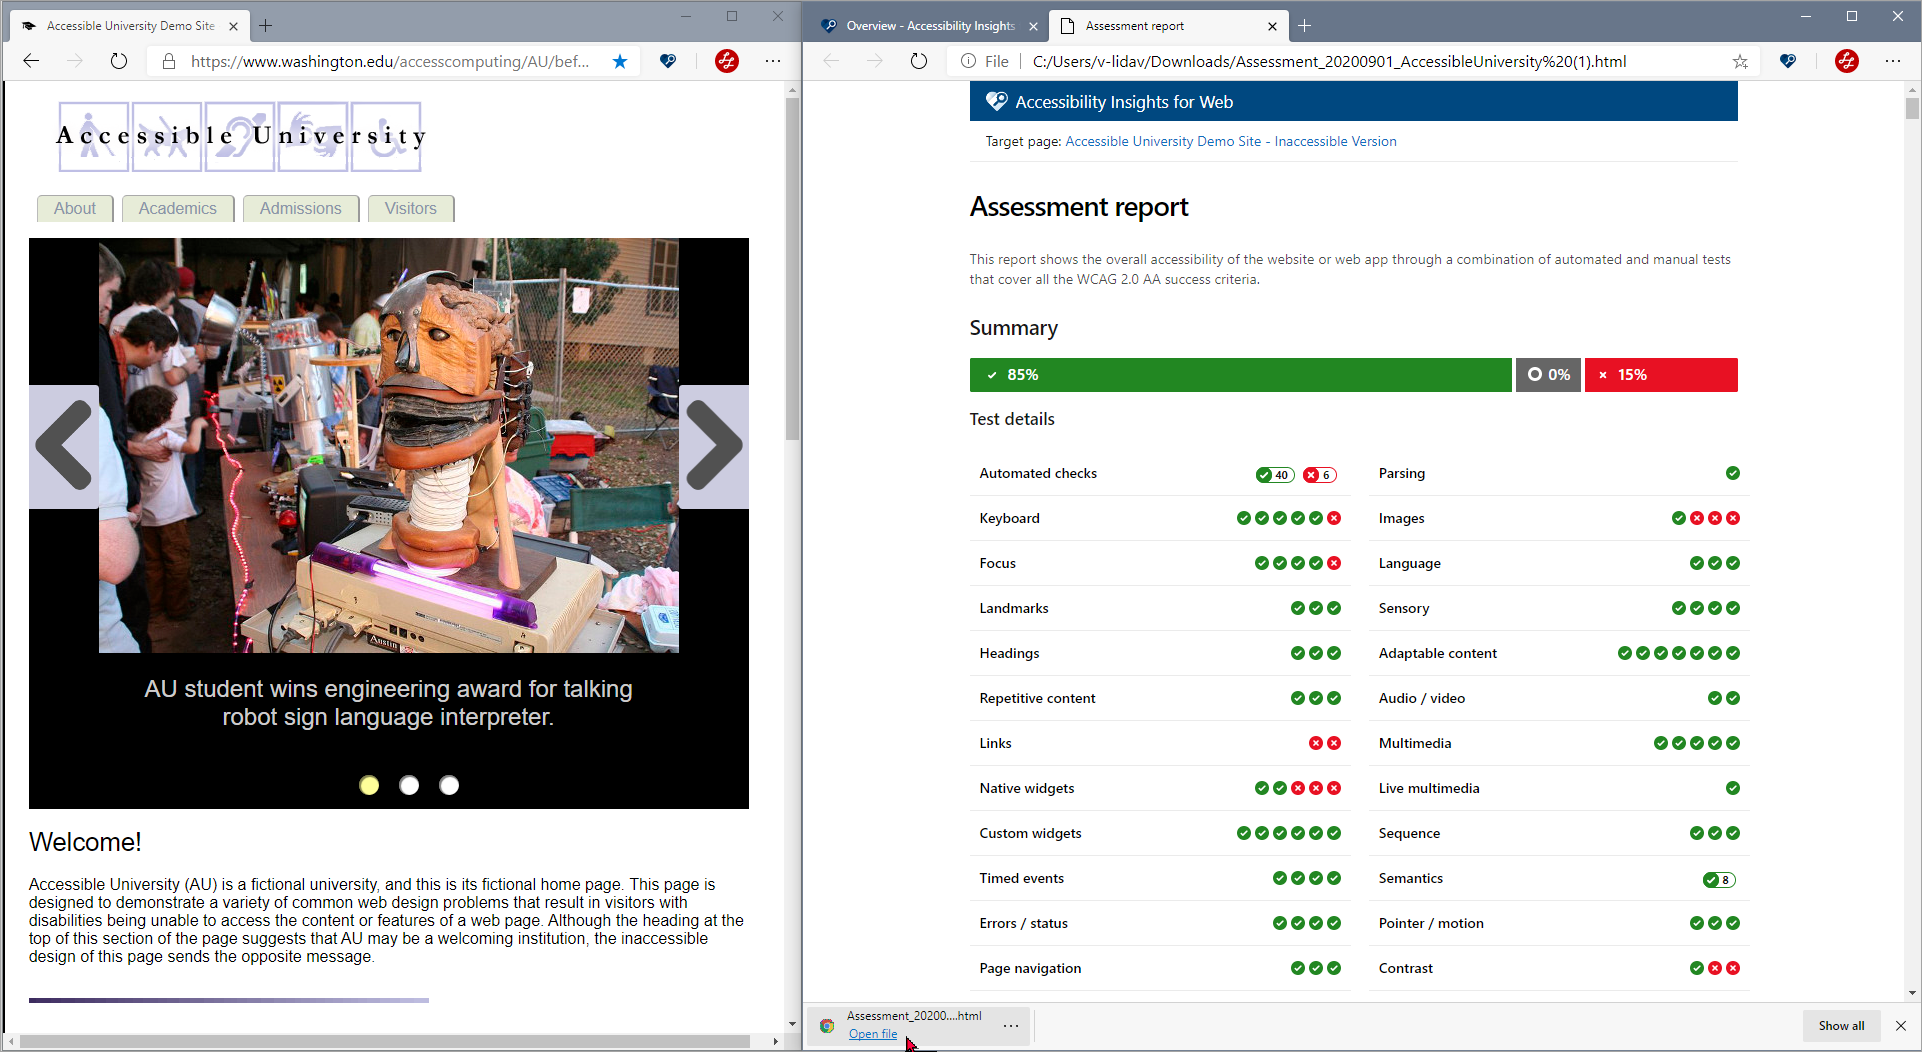
Share a detailed report of the assessment results
-
In command bar near the top of the page, select Export result.
A dialog will open.
-
Optional: In the dialog, provide a description for the report.
-
Select Export and choose one of the options.
To export as HTML
The HTML report groups results by the tests in Assessment and provides a summarized view of all the requirements and their state (pass, fail or incomplete).
- In the Export dialog, under the Export dropdown, select Export as HTML.
An HTML report will automatically download to your computer. Depending on your browser, the report might open automatically in a new browser tab, or you might have to open it manually.
To export as JSON
The JSON report groups results by the Success Criteria and provides a list of all the requirements under each S.C. The date for the JSON report is exported in ISO 8601 format and the report version is the same as the Accessibility Insights for Web extension version.
- In the Export dialog, under the Export dropdown, select Export as JSON.
A JSON report will automatically download to your computer.
Start Over
Start a new assessment
Data collected in an assessment will persist until you start a new assessment.
-
In the command bar near the top of the page, select Start over > Start over assessment.
Note: Depending on the width of your browser window, you might have to select the More items disclosure button to access Start over.
-
In the confirmation dialog, select Start over.
All data in the assessment will be cleared, and you will automatically navigate to the assessment Overview.
Start over a single test
Data collected in a specific test will persist until you start over the test (or start a new assessment).
-
Navigate to the test you want to start over.
-
In the command bar near the top of the page, select Start over > Start over <test name>.
Note: Depending on the width of your browser window, you might have to select the More items disclosure button to access Start over.
-
In the confirmation dialog, select Start over.
All data in the test will be cleared, and you will automatically navigate to the first requirement in the test you started over.
Save and Load an in-progress assessment
At any time, you can save an in-progress assessment and load it later on.
Save an assessment
-
In the command bar near the top of the page, select Save assessment.
The assessment file (a11ywebassessment) will automatically download to your computer.
Load an assessment
-
In the command bar near the top of the page, select Load assessment.
A file explorer will open.
-
In the file explorer, select the assessment file you want to load.
Note: Data collected in an assessment persists until you load or start a new assessment. If there is an in progress assessment already, a confirmation dialog will appear. Loading an assessment will clear all data in the local in-progress assessment.